What should I use to mark my quilt? This seems to be one of the most commonly asked questions in the quilting community – and sometimes, one of the most controversial.
The short answer is whatever gives you results that please you.
But who wants to spend a lot of money on tools that may or may not work for them? Or risk marking a quilt with marks that either won’t come out completely or perhaps come back later?
As a quilting instructor for more than 25 years now, I’ve seen (and tried) many different types of marking tools. I’ve kept track of what works (and doesn’t!) for me and for the participants in my classes. But times change, product formulas may change, and new products come on the market.
So I decided it was time for another test!
Most are items I’ve purchased myself, but several were given to me by quilt shop or business owners so that I could try them. This did not influence my conclusions – you can see the results in the photos.
Note: We’ll talk about no-mark marking options like Hera markers, butter spreaders and masking tape another time 🙂
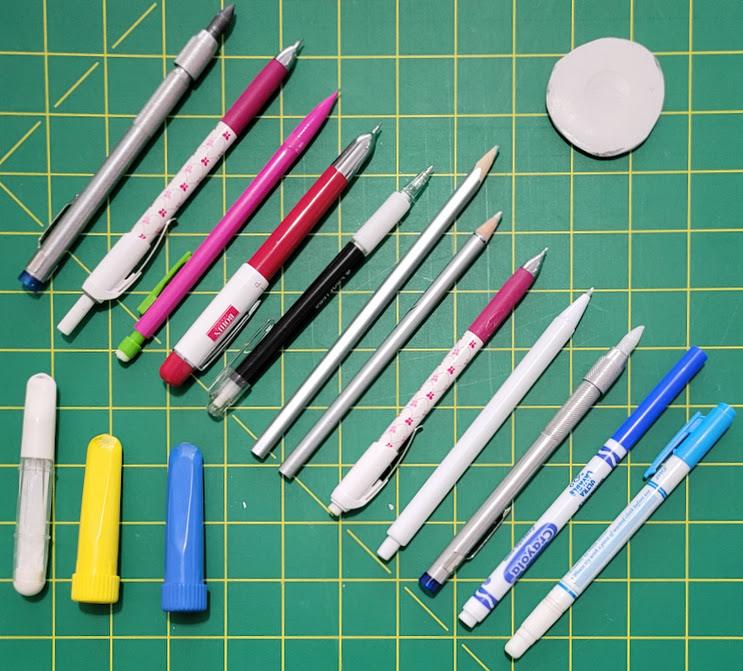
Here are the tools I tested:
- Washable graphite with thick, refillable leads
- Sewline mechanical pencil, graphite
- Papermate mechanical pencil (not designed for quilting industry)
- Bohin mechanical pencil, graphite
- Ultimate Marking Pencil for Quilters and Crafters (refillable, washable graphite)
- Finally! Fabric Marking Pencil from Bucklebee Tool and Pattern Shop
- Roxanne Quilters Choice Marking Pencils, Silver
- Bohin mechanical pencil, white chalk*
- Sewline mechanical pencil, white ceramic
- Sewline Tailor’s Click Fabric Pencil, white ceramic
- Soapstone, refillable (sharpened to break the seal)
- Clover Pen Style Chaco Liner, white
- Clover Chaco Liner, white
- Clover Chaco Liner, yellow
- Clover Chaco Liner, blue
- Tailor’s chalk, white (no wax)
- Crayola wash-away marker (not designed for quilting industry)
- Blue water-erasable marker*
- Frixion pen* (not designed for quilting industry)
*tested separately
To make it as “real-world” as possible, I sewed together leftover strips of fabric from previous projects (I like a lot of color!) and quilted it onto a layer of cotton batting and backing fabric.
I used a fine Sharpie to write the name of each marking tool I tested above the appropriate marked line.
I used short, overlapping strokes to make lines dark enough for me to see AND to avoid dragging on the surface of the fabric
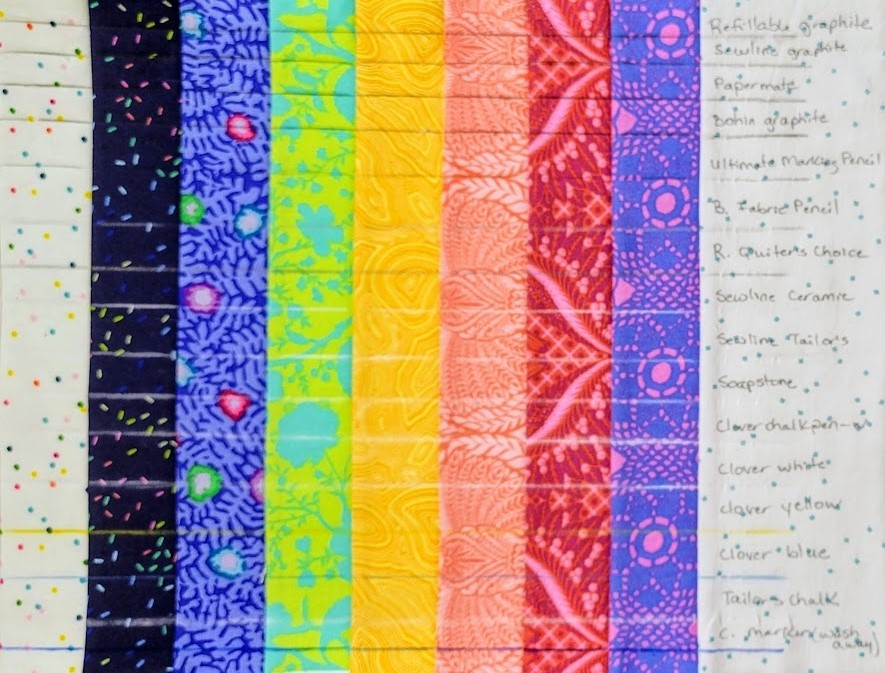
The next day, I ironed over the swatch, since being able to safely iron over the marks is important to me.
To help get the removal process started, I brushed over all the marks with a wet (not dripping) washcloth.
As you can see, some of the marks came off easily, some bled, and others were affected only slightly.
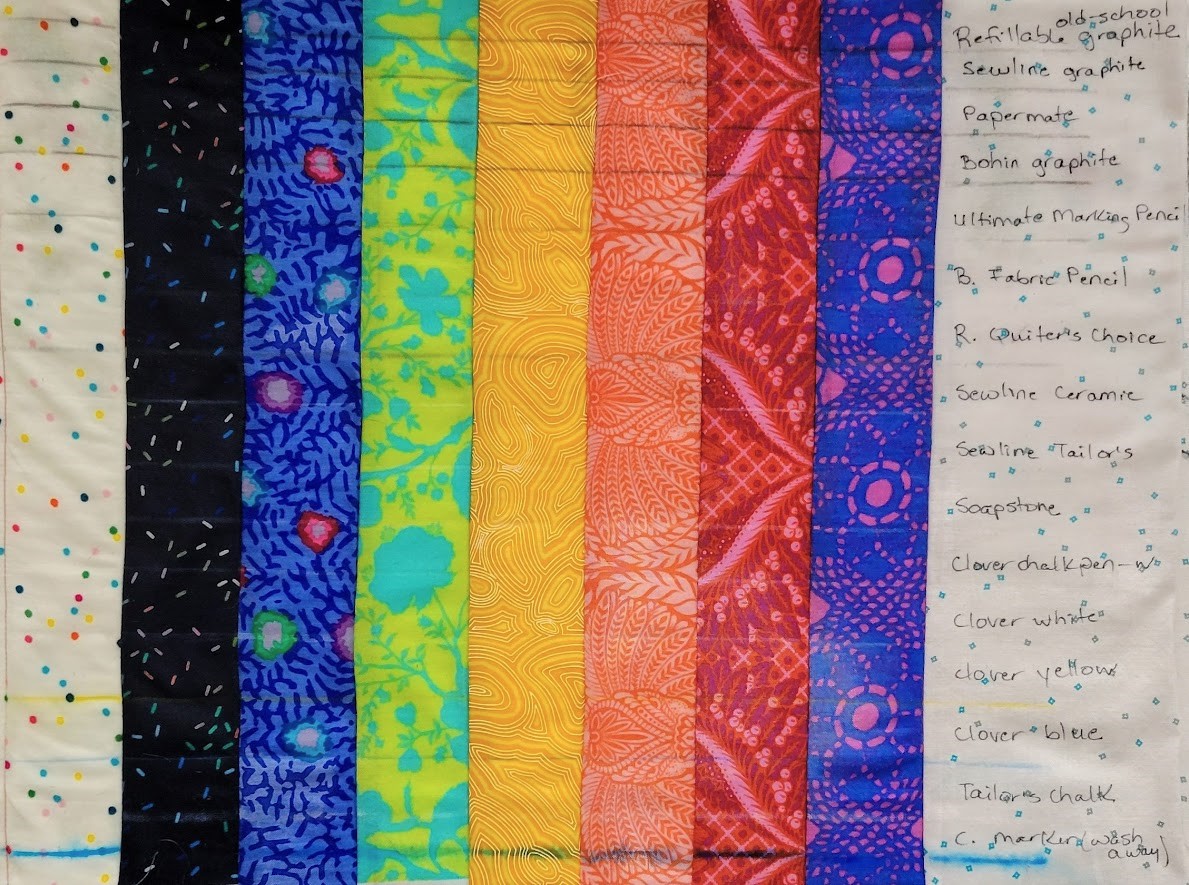
I washed the swatch in the washer (with my usual detergent) and dried in the drier.
The swatch came out of the dryer a little wrinkled, so I gave it a quick press.
Here are the factors that are important to me:
- Clearly defined lines, easy to see
- Ease of use (The lead in the mechanical pencils had a tendency to break, which was frustrating; however, the lines were nice.)
- Shows up well on light, medium, and/or dark fabrics
- Safe to iron over without setting the marks or causing them to disappear prematurely
- Easy to remove the marks
- No visible residue left on the fabric afterwards
- Marks do not return with changes in temperature, changes in humidity, exposure to sunlight, etc.
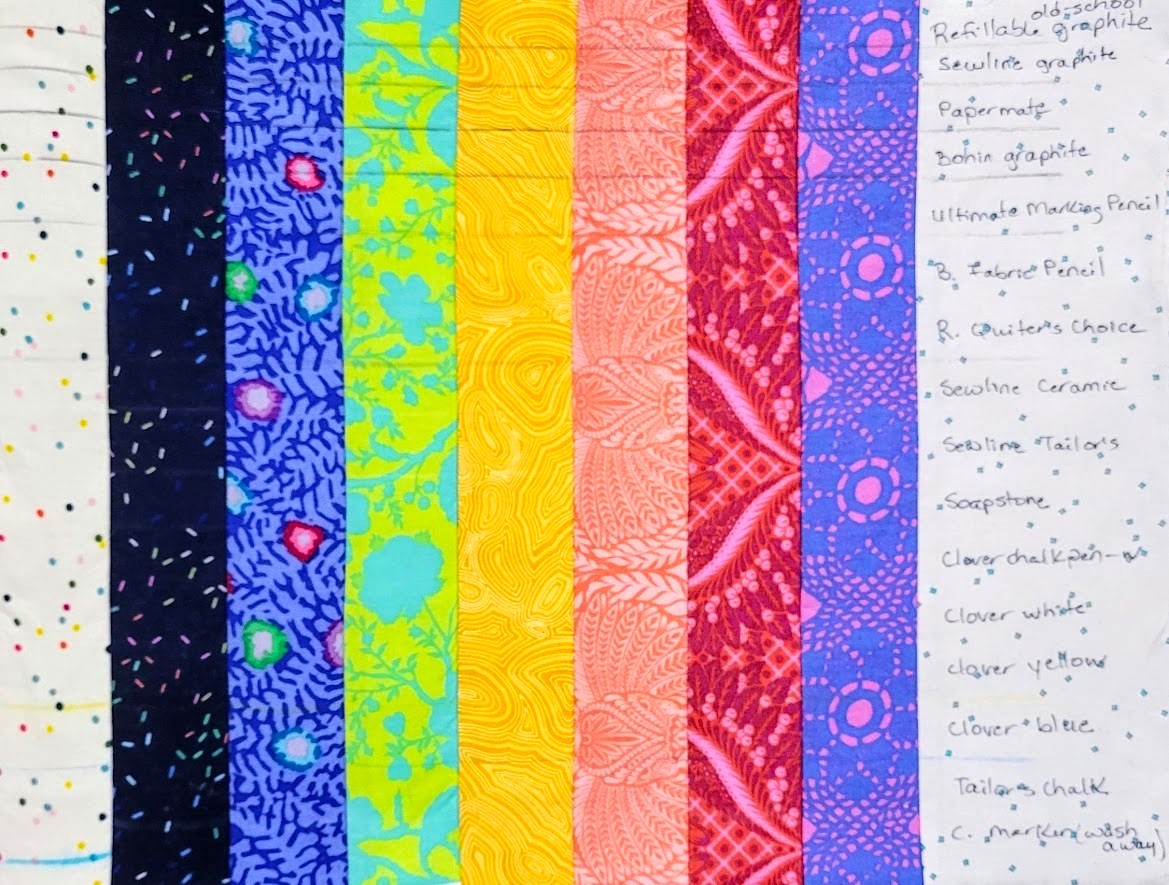
Here are my conclusions – applicable to me and the way I work.
Will happily use again:
- Finally! Fabric Marking Pencil from Bucklebee Tool and Pattern Shop (This silvery line showed up a little better in person than in the photo.)
- Clover Pen Style Chaco Liner, white (both styles performed well, but I prefer the pen style)
- Soapstone, refillable (sharpened)
- Tailor’s chalk, white only (without wax)*
*Wax can help chalk hold a sharper point and break less frequently, but it also can leave a residue.
Would use again, but would try not to press so hard:
- Ultimate Marking Pencil for Quilters and Crafters (refillable, washable graphite – this has been one of my go-to options for years; I just wish the lead wasn’t so fragile!)
- Bohin mechanical pencil, white chalk
- Sewline mechanical pencil, white ceramic
- Roxanne Quilters Choice Marking Pencils, Silver
I liked most of the other marking tools, but ONLY for marking cutting lines or marks that will be hidden in a seam allowance – NOT on the front of a quilt.
Has your experience been different from mine?
Here are some factors that may lead to different results or different conclusions:
- How dark your marks need to be for you to see them. (I can’t mark as lightly as I used to – I need darker marks now.)
- Whether or not the fabric has been washed to remove any sizing or finishes. (My fabric has all been washed ahead of time.)
- What the climate is like (hot/cold or wet/dry) where you live.
- How your water may have been chemically treated.
- What laundry detergent you use when you wash your quilts. (I use a gentle product for older quilts, but regular detergent for quilts in general use.)
- Whether or not you need to iron over the marks. (Depending on the techniques I’m using for that particular quilt, I may need to iron over the marks before I’m finished quilting.)
Do you have any favorites that I did not include in my test?
I’d love to hear about them!