Free-Motion quilting is one of my favorite – and occasionally dreaded – parts of quiltmaking. Favorite, because it allows me to play with color, line and texture; occasionally dreaded, because I sometimes (fortunately not nearly as often I used to) start to over-think everything and become stressed out.
But one of the good things about having 20+ years of experience with machine quilting is that I’ve survived all the most common mistakes (and some relatively uncommon ones, too!) and have learned lots of tricks and helpful techniques for both getting into a more productive headspace and then executing my ideas.
But let’s back up a minute…

A complete quilt top is just that – a top; it won’t become a finished quilt until it is layered with some kind of filling (usually batting) and a backing (usually fabric). This “sandwich” is held together by the quilting stitches. These stitches may be made by hand (hand quilting) or by machine. Machine quilting with straight lines or gentle curves is usually done with a walking foot or even-feed foot, which helps move all three layers through the machine at the same time, preventing tucks or ripples from shifting fabric and ensuring even stitches. This type of quilting is also referred to as machine-guided quilting, because the feed dogs in the machine work with the feed dogs in the presser foot to move the fabric.
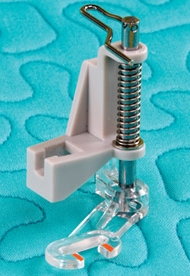
Free-motion quilting is also referred to as hand-guided machine quilting, because it is the quiltmaker’s hands, not the sewing machine, that control the stitch length and direction. The sewing machine needle goes up and down, but the machine can’t move the fabric (the feed dogs, which normally move the fabric through the machine, must be lowered in order to free-motion quilt). The presser foot (usually a free-motion or spring embroidery foot of some kind) lowers to hold the fabric against the needle plate when the needle enters the fabric, but rises up off the fabric when the needle comes back up and out of the fabric. This is wonderful because it gives us complete freedom – but it can also be scary, because it means it’s up to the operator – not the machine – to keep the fabric moving at just the right speed to control stitch length and in the right directions to create the desired design.
This may be the scariest part when you are starting out, but it’s also the most exciting once you get the hang of things. It’s kind of like drawing with an electric needle!
But you don’t need to be an artist to free-motion quilt; if you can doodle, you can do this! It does take plenty of practice, though; I caution my students not to judge the quality of their work until they’ve put in at least 10-20 hours (cumulative) of practice time. I find it’s best to keep initial practice sessions fairly short – 5, 10 or 15 minutes at a time. It’s counter productive to exhaust yourself or suffer painfully sore muscles the next day. (Ask me how I know this…)
Running the machine at a high speed tends to make it easier to achieve very fluid, flowing lines. However, it is NOT helpful to run the machine so fast that it becomes stressful, you don’t have time to think, or the stitches get very, very small. Moving the fabric too quickly results in long, often jagged stitches. The “sweet spot” is a balance between the speed of the machine and how quickly you move the fabric with your hands.
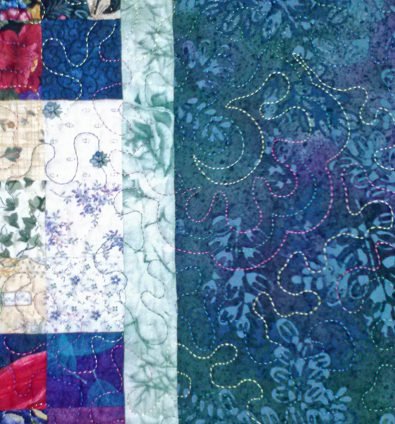
Most people think of stippling – the squiggly stitching that looks kind of like interlocking jigsaw puzzle pieces – when they think of free-motion quilting, but the reality is much broader than that. (You can see some stippling on the aqua fabric in the background of the photo of the Baby Lock Free-Motion Open Toe Quilting Foot, above.)
There are many different ways to stitch a continuous line of machine quilting and innumerable patterns that can be created. This is important to remember, especially when you are starting out, because I’ve found that not everyone finds it easy to stipple right off the bat. However, when introduced to some of the many other options, everyone eventually finds at least a couple basic patterns that are easier for them.
As you are learning, it will be much easier to get the hang of maintaining a consistent speed and rhythm while handling the bulk of the quilt if you stick with stitch patterning that seems to come more naturally to you – whether that be stippling, a straight-line geometric fill, loops, spirals, crescents, or anything else that might strike your fancy.
Once you have the basics down, it will be much easier to go back and pick up patterning that was initially more challenging for you to execute.
Most people find that it’s best to “work small” in the beginning – practice on smaller items such as pillow tops, placemats, table runners, etc. before moving on to larger projects.
I also recommend “warming up” on some scrap fabric before starting a new project. This serves a dual purpose – it will give you a chance to check the thread tension and it will help trigger the muscle memory that will help you create your chosen design.
Note: you may be interested in checking out my previous post Machine Quilting FAQ & Top Tips for more machine quilting info.
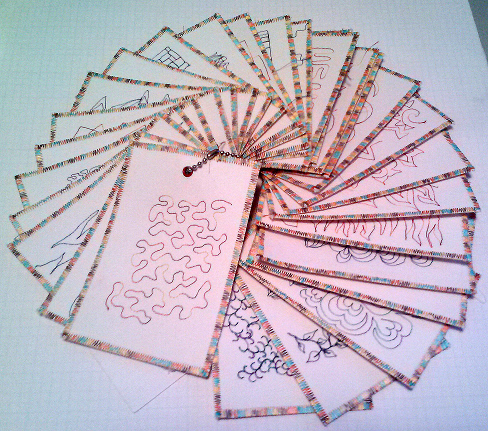
I keep stitch samples to help me visualize an idea, record a pattern I’ve seen, or generate ideas when I’m thinking about how I wish to free-motion quilt a new piece.
Ideas are everyone! Keep some paper handy for doodling – who knows what you might come up with while watching TV, looking at photographs, taking a walk, or riding along.
Although I’ve been machine quilting for a long time, I like to keep current. Here are a few recent machine quilting/free-motion quilting books that I particularly recommend:


One last note – the photos shown here are all of free-motion quilting that is rather small in scale. That is partly because they are detail shots of wall hangings, and partly because I really enjoy free-motion quilting and tend to quilt much more densely than is necessary from a functional point of view. For soft, nicely draping bed quilts, I actually prefer to work much larger in scale.